Many products are sold as aids to seemingly clean grease separators. These include acids and caustics with known hazards in handling, or so-called “miracle enzymes” with limited conditions and special instructions. There are also self-cleaning type separators with complicated operating instructions, as well as solids evacuating type separators with small print stating: “periodically remove accumulated solids.”
NOTE
CLEANING INSTRUCTIONS
NOTE
HOW TO CLEAN THE SEPARATOR ALL MODELS
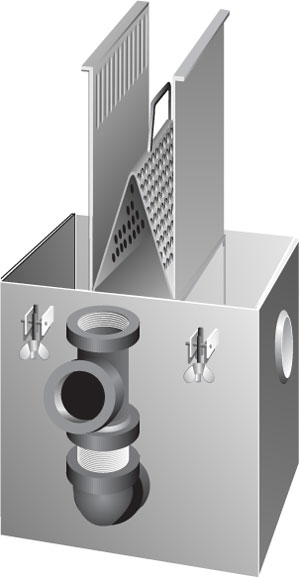
- Run cold water for a few minutes to congeal grease; turn off water.
- Loosen or remove attachment bolts, then remove the cover.
- Scoop out grease and oil from the top.
- Lift out V-shaped filter screen, and U-shaped separator screen (if the unit has a removable separator screen).
- Scoop out heavy sludge from bottom of unit.
- Replace all parts removed in number 4.
- Run water a few minutes to restore trap seal.
- Check gasket and replace if needed. See HOW TO REPLACE A GASKET.
- Replace cover and cross-tighten attachment bolts.
Cleaning and Maintenance Instructions should accompany every separator. It is a good practice to have a copy of the cleaning instructions located near the separator, directing the user on the proper operation/cleaning methods.
NOTE
Cover gaskets are necessary to seal against gases and to prevent overflows. They must be heavy and elastic enough to give easy sealing.
Separators are not pressure vessels.
Covers should be easily removable. When a separator is set in the floor, stainless steel bolts should be used (brass bolts are too easily stripped; steel bolts become rust locked).
NOTE
Separators not easily opened for cleaning will not be cleaned regularly.
Many products are sold as aids to seemingly clean grease separators. These include acids and caustics with known hazards in handling, or so-called “miracle enzymes” with limited conditions and special instructions. These type of products are NOT RECOMMENDED because of the damage they can do to the separator, as well as the fact that the separator catches the grease at the point of use to be disposed, and not to give the user a vessel to add chemicals into the waste stream.
CLEANING THE FILTER MEDIUM
- Shake V-shaped filter screen while wet or use hose to loosen fine, suspended waste material.
- Change filter screen with factory-installed medium as needed.
- Scoop out grease and oil from the top.
HOW TO REPLACE A GASKET ON-THE-FLOOR, G SERIES:
- Remove old gasket from groove on underside of cover.
- Cut four pieces of gasket per cover. Gasket must be cut square and 1-1/2″ longer than the required space. Insert the long side first.
- Insert gasket material evenly, filling in corners completely to assure leakproof and airtight fit.
- Do not over-tighten the cover – hand tighten only.
FLUSH-WITH-FLOOR, GF AND GFE SERIES:
- Remove old gasket from lip on body of the unit.
- Cut four pieces of gasket per cover. Gasket must be cut square and 1/4″ longer than the required space. Remove protective film to expose adhesive. Insert the long side first: insert ends first and then work from the center outward.
- Fasten new gasket to lip of unit, shaping openings for stainless steel bolts. Fill corners completely to assure a leakproof and airtight fit.
Factory will supply units strictly to details on wholesaler’s purchase order.
Grease and oil fall into two classifications with different characteristic designations. They are saponifiable or unsaponifiable. The saponifiable materials are those that will combine with caustics to form soap. Mineral or petroleum oils do not possess this characteristic.
Cleaning a grease separator with a caustic material can always be determined after removing the cover: if a large mass of dry hard matter is exposed on the surface – this is soap! A portion of the caustic, along with some grease, passes through the separator and mixes together to form soap, gradually building up and forming an obstruction in the drainage line. Particles of solids evacuated from the separator become part of this mixture and add further complications.
Cover gaskets are necessary to seal against gases and to prevent excessive surges from causing overflows. They must be heavy and elastic enough to give easy sealing.
Covers should be easy to remove. A superior cover bolt is constructed of eye bolts and nuts that swing down to remove the cover. When a separator is set in the floor, a non-ferrous metal bolt should be used (brass bolts are too easily stripped; steel bolts become rust locked).